
Choose, Fit, and Secure the Right Cap Without Damaging the Chimney
A no-drill design still needs correct fit and positive attachment. Match the flue dimensions and approved mounting surface, then verify an open exhaust path.
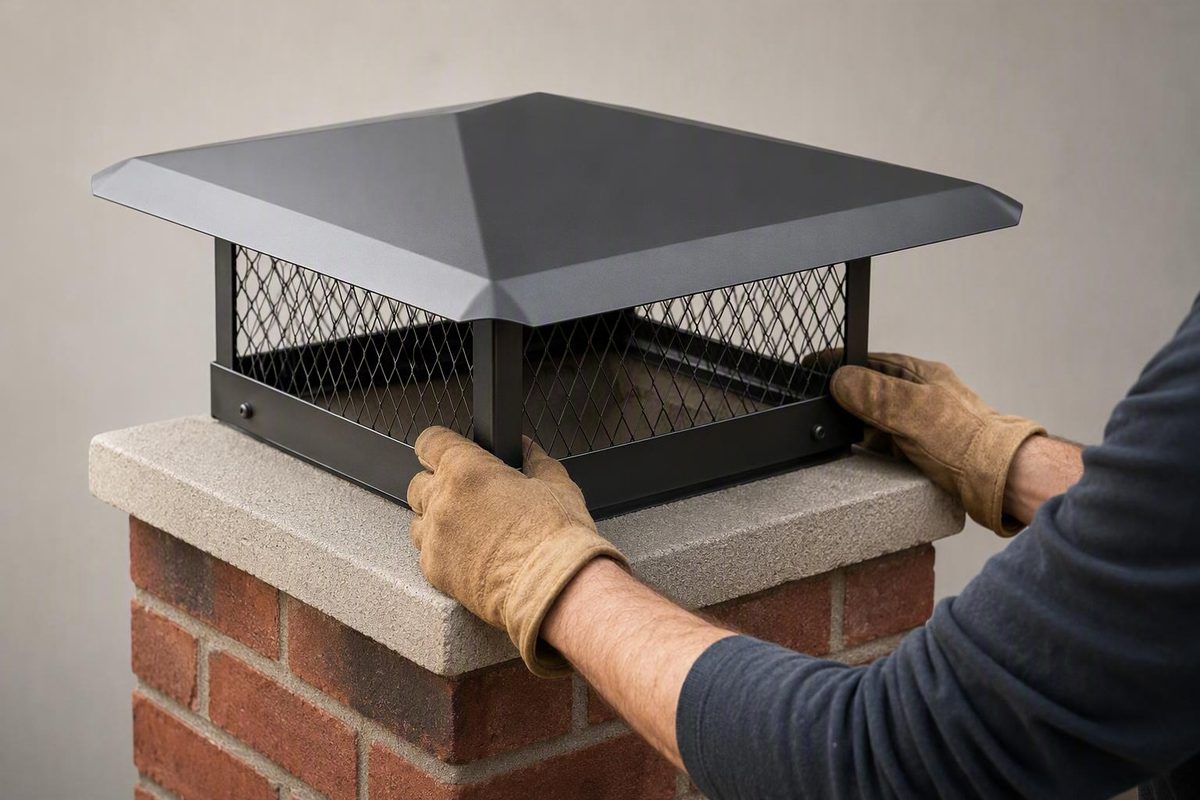
Choose, fit, and secure the right cap without damaging the chimney.
Before You Start: Decide Whether This Is a Safe DIY Project
Safety warning: This is general guidance, not a complete roof-access, fall-arrest, chimney-inspection, or appliance-venting procedure. The cap manufacturer’s current instructions, the chimney and connected-appliance listings, and applicable permit and inspection requirements control the work. Do not use this guide to improvise fall protection or override product documentation.
Attaching a chimney cap may involve only a few clamps or screws. Reaching the chimney, remaining stable beside it, handling tools at height, and returning safely are usually the greater hazards. A mechanically simple installation can still be unsuitable for DIY work.
Before accessing the roof:
- Follow the connected appliance’s shutdown instructions.
- Confirm that no fireplace, stove, furnace, boiler, or other appliance is operating or venting through the chimney.
- Allow the chimney, flue termination, and surrounding surfaces to cool completely.
- Stop if you cannot identify the connected equipment or determine whether the flue is active.
- Confirm that conditions are dry and calm.
- Confirm that the ladder can stand on a stable base and be secured appropriately.
- Establish suitable, properly planned fall protection.
- Gather the cap instructions, hardware, drivers, and measuring tools at ground level.
- Make sure you are comfortable with the roof pitch and chimney height.
Do not work over an actively venting flue. Combustion appliances and their venting are code-governed systems, and Mechanical Mentor’s terms and conditions state that its material is general reading and that permits and inspections apply to combustion appliances and venting.
Stop work and hire a qualified, insured chimney or roofing professional when:
- The roof is steep, damaged, wet, icy, or difficult to navigate.
- Wind, rain, snow, or unstable footing makes roof work unsafe.
- The ladder cannot be placed and secured correctly.
- Adequate fall protection cannot be established.
- You are uncomfortable with heights or inexperienced with roof work.
- Brick, mortar, crown material, or flue tile is cracked, loose, or deteriorated.
- The flue is obstructed or its condition cannot be established.
- The chimney’s construction or required termination is uncertain.
- An active appliance has poor draft, smoke spillage, unusual odors, or another suspected venting fault.
Roof-work guidance likewise identifies access, chimney condition, safety equipment, and comfort at roof height as factors in deciding whether to proceed or call a professional (This Old House’s chimney-cap installation guide).
A roofer may be appropriate when difficult access is the only problem. Choose a qualified chimney professional when the flue, liner, masonry, connected appliance, or venting performance also needs evaluation.
Cap selection and installation may also be affected by the chimney or appliance listing and local requirements concerning the permissible termination, mesh, clearances, attachment method, permits, and inspections. Generic dimensions found online must not override the current documentation for the exact cap and venting system.
Identify the Chimney and Match It to the Correct Cap
Chimney-cap installation is not one universal procedure. First identify the chimney construction, then determine the number, shape, and position of its flues.
1. Is it masonry or factory-built?
A masonry chimney normally consists of brick, block, stone, or similar masonry. It often has one or more clay flue tiles terminating above a masonry crown.
Do not attach a generic masonry cap merely because it appears to fit. If the chimney manufacturer, model, or listing cannot be identified, stop and obtain professional help.
2. Does a single flue project above the crown?
A projecting single flue has one clay tile extending above the crown far enough to accept the mounting base of a compatible cap. Common designs include:
- Clamp-on caps
- Friction-screw or corner-bolt caps
- Adjustable-bracket caps
- Multi-fit brace caps
- Compatible round slip-in caps
The cap fits over or into the specified part of the flue and is retained without drilling mounting holes in the crown. It must match the tile’s shape, dimensions, and projection.
3. Is the flue flush with or too close to the crown?
A flush-flue application has no suitable length of tile projecting above the crown. A cap intended to grip an extended tile may have nowhere to seat, so a compatible crown-mount or outside-mount design may be needed.
Do not force a clamp-on base onto a shallow tile edge. Its clamps or brackets must engage the surface and depth specified by the manufacturer.
4. Are there multiple flues?
A multi-flue chimney has two or more openings at the top. One larger cap commonly covers the complete group and attaches to a sound crown or, for certain products, a compatible brick surface.
Separate single-flue caps may be impractical when nearby lids overlap or interfere with required exhaust space. Trade guidance distinguishes projecting-tile single-flue caps from crown-mounted caps used over multiple or flush flues and notes that adjacent cap lids can conflict when flues are close together (Masonry Magazine’s cap-selection overview).
5. Which mounting design does the cap use?
Common mounting families include:
- Bolt-on or friction-screw: The base slides over a projecting tile, and designated fasteners press against its exterior.
- Adjustable bracket: Movable brackets are set within a stated fit range.
- Multi-fit brace: Braces connect the cover to a compatible projecting flue.
- Band around brick: A metal band tensions around an approved upper brick course.
- Slip-in: Flexible legs fit inside a compatible round opening.
- Crown mount: A flange is mechanically fastened to sound masonry.
- Outside mount: The cap attaches to an approved vertical masonry surface.
These descriptions identify installation families; they do not make the designs interchangeable. HY-C, for example, publishes different sequences for bolt-on, adjustable, multi-fit, band-around-brick, slip-in, and crown-mounted products (HY-C’s mounting-style guide).
Finally, distinguish the crown from the cap. The crown is the masonry surface that covers the chimney structure and sheds water from its top. The cap is the metal assembly over one or more flue openings. Installing a new cap does not repair a failed crown.
Find the exact cap model’s current instructions before ordering hardware. If they are missing, request them from the manufacturer rather than assembling a procedure from visually similar products.
Inspect and Measure Before Buying the Cap
Inspection should come before purchase. Damage may change the project from a cap installation into a masonry or chimney repair.
Inspect the chimney top
Examine all safely accessible parts for:
- Cracks across the crown
- Crumbling, flaking, or loose crown material
- Loose brick or deteriorated mortar joints
- Cracked, split, leaning, or loose clay tile
- Enlarged holes left by an old cap
- Corroded fasteners embedded in masonry
- Leaves, twigs, soot, stones, or other debris
- Birds, animals, nests, insects, or droppings
- Ice or standing water
- A blocked or narrowed opening
- Staining or evidence of recurring water entry
Stop if masonry moves when touched, the crown is heavily deteriorated, the flue tile is damaged, or an obstruction cannot be safely removed and identified. Installation should not conceal an unresolved defect. FAMCO’s top-mount guidance similarly calls for checking blockages, pests, and crown condition before installation and recommends professional masonry repair when the crown is heavily damaged (FAMCO’s multi-flue top-mount guide).
Measure a square or rectangular projecting flue
Record:
- Outside length
- Outside width
- Height projecting above the crown
Measure the tile, not the existing cap. If the tile is irregular, take readings at more than one point and compare all of them with the exact product’s permitted fit range. Do not invent an allowance.
Measure a round flue
Record both:
- Inside diameter
- Outside diameter
A slip-in cap may be selected by inside diameter, while an outside-clamping model may use outside diameter. Commercial chimney-selection guidance recommends recording both because round-cap designs use different reference points (Full Service Chimney’s measurement guide).
Also note whether the opening is truly round, whether a liner projects through another material, and whether the visible pipe belongs to a factory-built system. A cap intended for clay tile may not be suitable for metal venting.
Measure multiple flues
Record:
- Exterior length and width of each flue
- Combined outside footprint of the complete group
- Distance between neighboring flues
- Tallest flue height above the crown
- Crown length and width
- Usable sound crown area around the group
- Differences in flue elevation
- Obstructions that could interfere with the lid, mesh, or flange
The cap must cover every intended opening while maintaining the space required by its instructions. It also needs sufficient sound mounting area for the flange.
Measure a flush flue or outside-mount application
Record the crown’s overall length and width, then determine how much sound, unobstructed masonry is available for the mounting flange. Note slopes, raised edges, joints, cracks, and old holes.
For an exterior brick mount, confirm the dimensions and condition of the intended brick course and verify that the product is approved for that surface.
Chimney-cap measurement worksheet
| Field | Measurement or observation |
|---|---|
| Chimney construction | Masonry / factory-built / metal / air-cooled / uncertain |
| Connected appliance or fireplace | |
| Fuel, if active | |
| Number of flues | |
| Flue shape | Square / rectangular / round / other |
| Projecting or flush | |
| Exterior flue length | |
| Exterior flue width | |
| Round-flue inside diameter | |
| Round-flue outside diameter | |
| Projection height above crown | |
| Tallest-flue height | |
| Combined flue-group footprint | |
| Spacing between flues | |
| Crown length | |
| Crown width | |
| Usable sound mounting area | |
| Crown or masonry defects | |
| Flue-tile defects | |
| Obstructions, nests, or debris | |
| Existing holes or old hardware | |
| Exact cap model and fit range | |
| Required mounting hardware | |
| Required clearances and mesh | |
| Sealant or adhesive permitted? | |
| Local permit or inspection requirement |
There is no universal sizing tolerance. A cap labeled “adjustable” still has a defined fit range and approved mounting surface.
A cap that fits dimensionally is not necessarily a compatible termination.
Gather the Product-Specific Tools and Prepare the Mounting Surface
Gather everything at ground level. Repeated trips increase roof exposure and create more opportunities to drop tools or leave the installation unfinished.
Core checklist
For most installations, prepare:
- Correctly sized, compatible cap
- Current manufacturer instructions
- Tape measure
- Supplied clamps, brackets, bolts, braces, bands, or other hardware
- Correct screwdriver, wrench, socket, or drill driver
- Every required driver and bit type
- Work gloves
- Eye protection
- Suitable high-traction footwear
- Stiff brush or hand broom
- A controlled way to secure and transport tools
- A way to record final installation details
Keep your hands free while climbing. Tool transport and fall protection must be planned rather than improvised.
Crown-mount additions
Only for a compatible crown-mounted cap, the checklist may also include:
- Masonry-rated bit in the specified diameter
- Manufacturer-approved masonry screws or anchors
- A specified depth-control method
- Pencil or masonry marker
- Vacuum or brush for drilling dust
- Adhesive or sealant expressly required or permitted
- The application tool specified for that product
Supplied hardware and current instructions control. Do not substitute a generic fastener merely because it fits the driver.
Prepare a replacement installation
After establishing safe access, remove the old cap and its designated hardware. Inspect for:
- Corroded or fractured fasteners
- Elongated mounting holes
- Cracks radiating from old holes
- A tile loosened by previous clamps
- Distorted or rusted brackets
- Failed adhesive or sealant
- Crumbling crown material
- Evidence that the old cap shifted or rocked
Do not automatically reuse old holes. A hole that is oversized, misaligned, too close to an edge, or surrounded by weak material may not retain the specified fastener. Damaged substrate may require professional repair.
Brush away loose sand, stone, droppings, soot, old adhesive, and drilling debris. The cap must bear on its intended mounting surface, not on material that can compress or wash away.
Treat sealant as product-specific
Published installation guides do not treat sealant uniformly. Depending on the product and mounting design, it may be required, optional, or unsuitable.
Use adhesive or sealant only when the exact instructions approve it for:
- The cap material and finish
- The crown or brick substrate
- Expected temperature exposure
- The mounting design
- Drainage and ventilation paths
- Warranty conditions
Do not use sealant to compensate for a rocking flange, cracked crown, incorrect cap size, or inadequate fasteners. Screw count, diameter, bit size, hole depth, flange setback, and adhesive placement must remain product-specific.
Install a Single-Flue or No-Drill Chimney Cap
These are common mounting patterns, not substitutes for the exact manufacturer’s sequence. Use only the subsection matching the product.
Bolt-on or friction-screw cap
For a compatible projecting flue:
- Confirm the stated fit range against the measured tile.
- Back off the clamps, screws, or corner bolts enough to clear the tile.
- Lower the cap squarely over the flue.
- Seat it to the specified depth without forcing it.
- Center the base and check the lid alignment.
- Bring opposing fasteners into contact gradually.
- Alternate between opposite sides or corners while tightening.
- Stop when the cap is retained as the instructions specify.
The fasteners press against the exterior of the clay tile. They are not drill points and should not penetrate the tile. HY-C’s bolt-on guidance specifically describes corner bolts tightening against a correctly sized flue rather than being driven through it (HY-C’s bolt-on installation guidance).
Do not overtighten. Excessive force can crack clay, distort the base, strip hardware, or pull the assembly out of alignment.
Adjustable-bracket cap
For a compatible adjustable model:
- Set the movable brackets to the measured dimensions.
- Leave enough looseness for positioning.
- Place the designated bracket surfaces correctly on the tile.
- Center the lid and screen assembly.
- Tighten the specified hardware in stages.
- Alternate sides to preserve alignment.
- Confirm that each bracket has the required engagement.
“Adjustable” does not mean universal. Do not extend, reverse, or relocate brackets unless the instructions permit it.
Multi-fit brace cap
A multi-fit design commonly uses braces between the cover and a compatible projecting flue:
- Loosely connect each brace to the cover.
- Lower the assembly over the flue.
- Attach or clamp the lower brace ends to the approved part of the tile.
- Center the cover.
- Check lid height and screen position.
- Tighten the braces evenly.
- Complete final tightening only after the assembly is aligned.
Leaving the braces loose initially allows alignment before the connections are fully loaded.
Band-around-brick cap
For a product specifically designed to tension around an upper brick course:
- Inspect the course for loose brick, open joints, and deterioration.
- Fit the band around the approved course.
- Square the cap with the chimney.
- Bring each corner into tension gradually.
- Alternate corners until the band is evenly retained.
- Confirm that no corner is bowed, lifted, or carrying the full load.
This method uses band tension rather than drilled fasteners. It is unsuitable when the brick course is loose or incompatible with the band geometry.
Round slip-in cap
For a compatible round opening:
- Verify that the inside diameter falls within the cap’s specified range.
- Inspect the opening for cracks and obstructions.
- Compress or guide the flexible legs as directed.
- Insert them evenly.
- Seat the cap in its designed position.
- Confirm that leg tension holds it level and stable.
Do not force a cap that does not fit. Unexpected resistance can indicate an incorrect size, obstruction, damaged opening, or incompatible product.
Check every no-drill installation
Inspect for:
- Rocking or rotation
- A tilted lid or uneven base
- Unevenly loaded fasteners
- Screen gaps caused by distortion
- Hardware projecting into the exhaust opening
- Interference with an adjacent flue or cap
- Inadequate engagement with the mounting surface
- Contact between the lid and a flue termination
- A cap that can lift because its clamps or legs are not engaged
A no-drill design still requires correct fit and positive attachment. “No drill” does not mean “no fastening.”
Install a Multi-Flue Cap on a Sound Masonry Crown
This procedure applies only to a compatible multi-flue or top-mount cap on a structurally sound masonry crown. Do not apply it to factory-built chimney systems, damaged crowns, or products that specify another mounting surface.
1. Dry-fit the cap
Place the cap over the flue group without adhesive. Confirm that:
- Every intended opening is covered.
- The mesh and lid do not touch a flue termination.
- Required exhaust space is maintained.
- The flange rests on sound crown material.
- Loose debris or high spots are not supporting the assembly.
- Drainage paths remain open.
- Approved hole locations fall on sound masonry.
If the flange rocks, remove the cap and identify the cause. Do not rely on fasteners to pull a poorly fitting flange flat.
2. Center and square it
Align the cap with the chimney while maintaining the crown-edge setback specified for that model.
Check alignment from more than one side. A flange can appear centered from the front while remaining skewed relative to the flue group.
3. Mark approved mounting holes
Mark only the holes identified by the instructions. Do not add fasteners simply because unused flange area is available.
Before drilling:
- Confirm that every mark lies on sound crown material.
- Make sure no hole would enter clay flue tile.
- Remove the cap unless the product instructions expressly specify drilling through the positioned flange.
- Secure the cap where it cannot slide or damage the roof.
4. Drill the crown
Use the masonry-bit diameter and pilot-hole depth specified by the cap and fastener manufacturers.
- Drill perpendicular to the crown surface.
- Drill only in approved sound masonry, not clay flue tile.
- Control the depth.
- Avoid enlarging the hole by rocking the drill.
- Stop if the crown cracks, crumbles, shifts, or fails to produce a sound hole.
A crown that cannot retain the specified fastener requires assessment or repair, not a larger improvised screw.
For one applicable HY-C multi-flue product, the published procedure specifies a flange setback of at least 1 inch, a 3/16-inch bit, and holes 1.5 inches deep. Those dimensions belong to that product and are not general crown-mount standards.
FAMCO’s top-mount guide presents different screw quantities, dimensions, and pilot-hole ranges, demonstrating why details from separate manufacturers must not be combined (FAMCO’s product-specific specifications).
5. Clear the holes and surface
Remove drilling dust from the pilot holes and crown so the specified fasteners—and any approved adhesive—can seat correctly.
Inspect the crown again. Stop if drilling exposed voids, loosened material, or created new cracks.
6. Apply approved adhesive or sealant, if required
If the current instructions require or permit it:
- Confirm the approved product and application conditions.
- Apply it only in the specified locations and amount.
- Keep drainage and ventilation paths open.
- Keep it out of pilot holes unless directed otherwise.
- Do not spread it indiscriminately beneath the cap.
Do not assume adhesive can replace required mechanical fasteners.
7. Reposition and start the fasteners
Set the cap back over the pilot holes. Start each masonry screw loosely or partway rather than fully tightening the first one.
With every fastener engaged:
- Recheck centering.
- Confirm that the flange remains flat.
- Verify lid and screen clearance.
- Confirm that each fastener enters its pilot hole straight.
8. Tighten in a balanced sequence
Tighten progressively, moving between opposite sides. Stop when the flange is securely retained as the instructions specify.
Do not continue until the flange bends, the screen racks, or masonry begins to fail. If one corner remains raised, remove the cap and correct the surface or fit problem.
Do not attempt an undocumented “universal” installation. If the complete current instructions are unavailable, obtain them before proceeding.
Complete a Final Check Without Lighting a Test Fire
Use a non-combustion inspection. Do not light paper, kindling, or an appliance merely to see whether smoke moves.
Stability and alignment
Confirm that the cap:
- Sits evenly for its design
- Covers the intended flue or complete group
- Does not rock, twist, or shift under a careful hand check
- Has no visibly distorted base, flange, or screen
- Does not touch an adjacent cap or termination
Apply only light inspection force. Do not use the cap as a support or handhold.
Hardware engagement
Confirm that every designated component is engaged:
- Clamps contact the intended tile surface.
- Friction screws or bolts are evenly tightened.
- Adjustable brackets remain within their permitted positions.
- Braces are attached at both ends.
- Brick bands are evenly tensioned.
- Slip-in legs have stable internal engagement.
- Crown fasteners are seated without distorting the flange.
Look for loose components or unused designated holes that may indicate a missed step.
Screen and exhaust path
Inspect the mesh for unintended gaps at corners, seams, and the base. Confirm that it remains attached and has not been pulled out of shape.
Where visibility permits, verify that:
- No bracket or fastener obstructs the flue path.
- No adhesive or sealant has entered an opening.
- The screen is not collapsed toward the termination.
- The lid does not contact the flue.
- Packaging, nesting material, masonry fragments, and installation debris are absent.
- Every intended flue remains open.
Required lid height, mesh clearance, and open area depend on the cap, chimney or appliance listing, and local requirements. Do not impose a universal six- or eight-inch rule.
Crown and work-area inspection
After fastening, check for:
- New crown cracks
- Spalling around pilot holes
- Loose fragments
- Fasteners that spin without holding
- Old holes that have enlarged
- Sealant blocking drainage
- Pockets beneath the flange that could retain water
Remove drill dust, wire, packaging, loose hardware, and all tools. Account for every item before leaving the roof.
For its top-mount procedure, FAMCO recommends a follow-up check after two to three days. Use that interval only when it applies to the product, any curing requirements have been followed, and the location can be accessed safely.
If an active fireplace or appliance subsequently develops smoke spillage, poor draft, unusual odors, vibration, whistling, or another suspected restriction, stop using it and arrange qualified evaluation. Do not continue operating it while changing cap adjustments by trial and error.
Inspect and Maintain the Cap After Installation
Check the cap periodically and after significant wind, rain, snow, or ice rather than relying on one universal calendar interval.
From the ground or another safe observation point, look for:
- A shifted, tilted, or missing cap
- Loose, backed-out, or absent hardware
- Rust, coating failure, or other corrosion
- Bent mesh or lid damage
- Cracks in the crown or adjacent masonry
- Enlarged holes around crown fasteners
- A band that has moved
- A slip-in cap that has risen or rotated
- Evidence of recurring wind movement or impact
Inspect the mesh for soot, creosote, leaves, twigs, nesting material, and ice that could reduce its open area. Do not climb to clear it unless safe access and suitable protection can be established.
Moving wind-directional caps need additional attention because soot or ice can seize their rotating or pivoting parts. A stuck mechanism may no longer behave as designed.
Arrange a professional chimney inspection when:
- The cap repeatedly shifts or loosens.
- Fastener holes continue to enlarge.
- Crown, mortar, brick, or tile deterioration is progressing.
- The cap cannot be reached safely.
- Mesh blockage cannot be removed safely.
- An active system develops smoke, draft, odor, noise, or venting symptoms.
- Water entry continues despite the cap.
- The chimney’s construction or condition remains uncertain.
Contractor maintenance guidance recommends checking caps after significant weather for looseness and damage and removing debris or soot that obstructs the mesh (Bethel Custom Brick’s maintenance overview).
Keep the following with the home’s maintenance records:
- Cap manufacturer and model
- Purchase and installation dates
- Measured dimensions
- Mounting method
- Hardware specification
- Sealant or adhesive used, if any
- Product instructions and warranty documents
- Installer information
- Before-and-after photographs
- Inspection, cleaning, and repair history
These records reduce the likelihood that a future installer will guess at the cap size or reuse incompatible hardware.
Chimney Cap Installation FAQs
Can I install a chimney cap without drilling?
Yes, if the chimney and cap support a compatible no-drill method. Examples include clamp-on or bolt-on caps for projecting tiles, approved band-around-brick designs, bracketed multi-fit caps, and some round slip-in models.
“No drill” does not mean a cap can rest unsecured on the chimney. The attachment must match the flue dimensions and approved mounting surface. A flush-flue or multi-flue arrangement may instead require a crown-mounted cap with masonry fasteners.
Do not select a no-drill design merely to avoid repairing damage. A loose flue tile or deteriorated brick course may not safely support the alternative attachment.
Should chimney-cap screws go through the clay flue tile?
No—not for a standard clamp-on or bolt-on cap designed to fit over a projecting clay tile. Its designated screws or bolts press against the tile’s exterior rather than penetrating it.
If a product appears to require penetration of a liner or tile, stop and verify its current instructions and compatibility.
Do I need sealant under a chimney cap?
Not universally. Sealant may be required, optional, or unsuitable depending on the cap, mounting design, substrate, finish, temperature exposure, drainage arrangement, and warranty.
Use only an adhesive or sealant approved by the cap manufacturer and apply it only where directed. Do not block drainage or ventilation paths, and do not substitute sealant for required mechanical fasteners.
A rocking flange or cracked crown is a fit or substrate problem. Covering it with sealant does not create a sound mounting surface.
How much clearance and what mesh size does a chimney cap need?
There is no single clearance or mesh opening that applies to every cap and location. The correct specification may depend on:
- Cap model and listing
- Chimney or vent system
- Connected appliance and fuel
- Flue size and required exhaust area
- Spark-arrestor provisions
- Soot and ice exposure
- Local building and fire requirements
Trade guidance reports different mesh practices in different regions, illustrating why local spark-arrestor requirements and blockage concerns can produce different specifications (Masonry Magazine’s discussion of mesh requirements).
Do not reduce specified clearance to fit beneath an obstruction. Do not replace approved mesh with a finer screen without authorization, because a finer screen can reduce open area and may be more vulnerable to blockage.
When should I hire a professional to install a chimney cap?
Hire a qualified, insured professional when:
- The roof is steep, high, slippery, damaged, or difficult to access.
- Weather prevents stable roof work.
- Proper ladder placement or fall protection cannot be established.
- You are uncomfortable working at height.
- The chimney is factory-built or of uncertain construction.
- The required termination or cap compatibility is unknown.
- The crown, brick, mortar, tile, or old mounting holes are damaged.
- A blockage, pest nest, or liner problem is suspected.
- An active fireplace or appliance has draft or venting symptoms.
- You cannot determine whether connected equipment is shut down.
- Crown drilling or masonry repair exceeds your experience.
- Product instructions are missing, unclear, or inconsistent with the chimney.
- Local permit, inspection, or other requirements cannot be confirmed.
Choose a chimney professional when the chimney or appliance also needs inspection. A roofer may be able to manage difficult access, but chimney-condition and venting questions require relevant chimney and combustion-system expertise. This Old House similarly recommends weighing chimney accessibility, damage, safety equipment, and comfort with roof work before attempting installation (guidance on when to call a professional).
The sequence to remember is straightforward: identify the chimney, measure for the exact cap, inspect the crown and flue, use only the specified mounting method and hardware, and verify a stable fit with an open exhaust path. When the chimney type, masonry condition, product requirements, local rules, appliance status, or safe roof access cannot be confirmed, stop rather than improvise.