
Choose the Right Fireplace Makeover for Your Brick, Room, and Skill Level
Preserve and clean sound brick, or choose a recoloring finish that matches the substrate and location, then test it before committing.
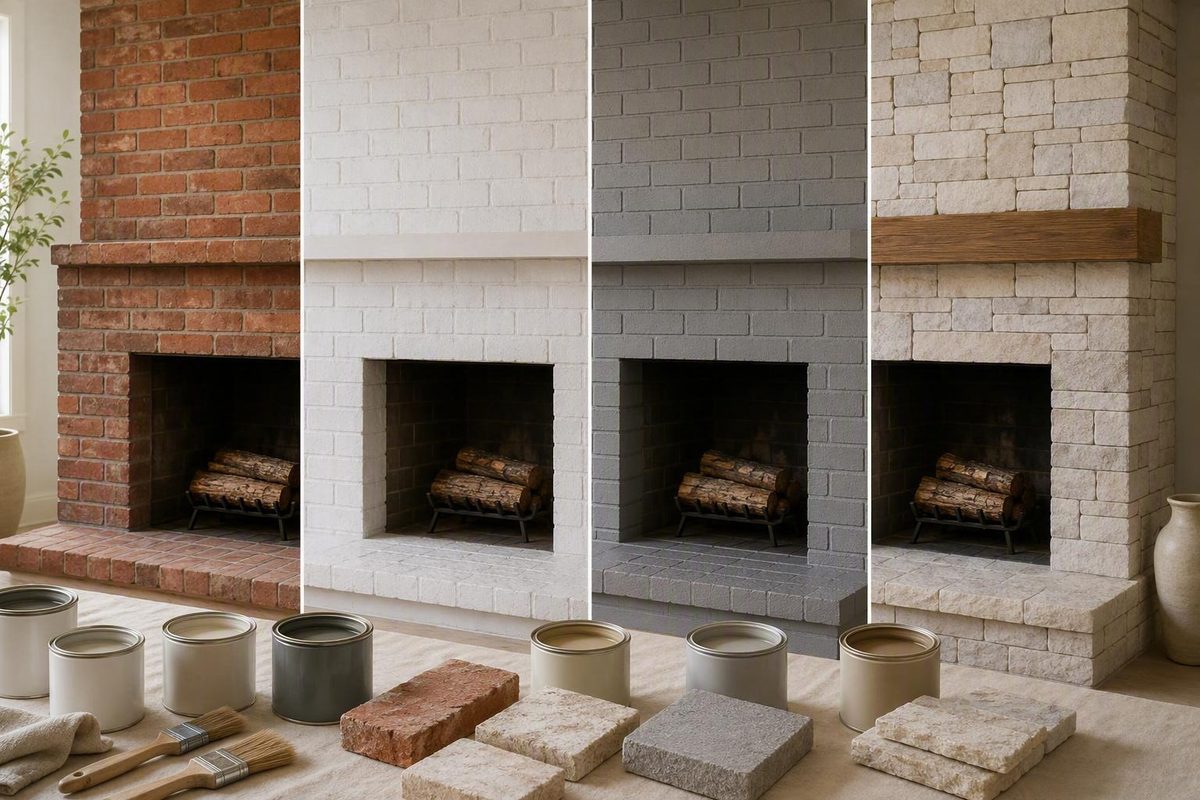
Learning how to update a brick fireplace starts with a less exciting question than “Which color should I choose?” First determine what you are working with: sound or damaged masonry, bare or coated brick, a decorative opening or an operating appliance, and an outer surround or a surface exposed to direct combustion heat.
Those facts shape whether cleaning, paint, limewash, diluted-paint whitewash, masonry stain, German smear, or a larger renovation belongs on the shortlist. They also help define whether the work is a reasonable cosmetic DIY project or should stop with a qualified professional.
Treat the fireplace as an assembly, not a single decorative wall. The firebox, hearth, brick surround, mantel, insert, trim, chimney, and ventilation components perform different functions. A sound makeover preserves those distinctions, follows the instructions for the specific products and appliances involved, and does not conceal defects that still require diagnosis.
Start With the Fireplace’s Condition, Not a Paint Color
Before buying supplies, inspect the fireplace in good light. Remove portable decor, tools, and accessories so you can see the brick faces, mortar joints, edges, and transitions.
Look for:
- Cracked, loose, missing, or moving bricks
- Flaking or crumbling brick faces, often called spalling
- Recessed, cracked, powdery, or missing mortar
- Gaps between the fireplace and adjoining walls
- Rust-colored, brown, black, or otherwise unexplained stains
- Damp areas or stains that return after cleaning
- White crystalline deposits, often called efflorescence
- Heavy soot embedded in brick or mortar
- Blistered, peeling, chalking, or loose coatings
- Cracks or movement in the hearth
- Loose mantel components, doors, screens, trim, or vents
Do not hide damaged masonry beneath paint, mortar, tile, or another finish. Cracked, loose, missing, or spalled brick and deteriorated mortar should be assessed and repaired before cosmetic refinishing, according to brick-fireplace inspection and repair guidance from masonry supplier Batchelder & Collins.
Extend the inspection beyond the visible surround. Without dismantling equipment or climbing onto a roof, check the accessible hearth, firebox surfaces, damper, screen or doors, metal trim, insert, and visible ventilation components. If the chimney can be observed safely from the ground, look for obvious exterior deterioration.
Next, identify the fireplace configuration:
- Decorative or decommissioned: Confirm that it is not intended for operation rather than assuming that an unused opening is permanently inactive.
- Wood-burning masonry fireplace: The firebox, damper, chimney, flue, hearth, and surrounding construction are part of the operating system.
Pause the makeover if you find moving masonry, extensive spalling, significant cracking, persistent moisture, chimney concerns, uncertain ventilation, or an unclear appliance configuration. Do not disconnect, modify, or reconnect gas components as part of a casual makeover. Fireplace-renovation guidance recommends qualified help for structural work, chimney inspection, gas-line work, and specialized appliance installation (fireplace renovation planning and safety guidance).
Match the professional to the problem:
- A qualified mason can assess deteriorated or moving masonry.
- A chimney professional can evaluate accessible chimney, flue, liner, and damper concerns.
- A fireplace specialist can identify appliance, venting, service-access, and installation requirements.
- A qualified gas technician should handle work that involves gas disconnection, modification, or reconnection.
This article addresses cosmetic decisions and general surface workflows. Cosmetic work does not repair structural movement, stop moisture entry, correct chimney defects, or establish that an appliance is safe to operate.
Identify the Brick Surface and Set the Scope
Once the fireplace is suitable for cosmetic work, identify the substrate. A finish intended to penetrate bare porous brick can behave very differently on sealed, painted, dense, dirty, or moisture-affected masonry.
| Existing condition | What it means for the project |
|---|---|
| Bare, porous, sound brick | May accept a compatible masonry coating, traditional limewash, or penetrating stain after cleaning and testing. |
| Bare brick that repels water | May be sealed, dense, contaminated, or naturally resistant to absorption. Determine the cause before choosing a penetrating finish. |
| Sound painted brick | Treat it as a coated surface and select a complete system intended for that existing coating. |
| Peeling, glossy, powdery, or unidentified paint | Do not cover loose material. Obtain product-specific preparation advice after assessing why the coating is failing. |
| Damaged or moisture-affected masonry | Stop cosmetic work until the underlying condition has been evaluated and addressed. |
For apparently bare brick, place a small amount of clean water on an inconspicuous area. Brick that darkens and absorbs the water may be porous.
This spot test is only a preliminary indication. It does not establish adhesion, heat suitability, even penetration, or the finished appearance. Ring’s End describes water absorption as a compatibility check for the limewash product in its guide, while also directing users to product-specific preparation and application instructions (limewash porosity and application guidance).
Paint and sealers can prevent penetrating products from interacting directly with masonry pores. Consequently, traditional limewash and penetrating stain should not be expected to behave on coated brick as they do on suitable bare brick. A manufacturer may offer a primer and decorative mineral system for an existing coating, but that is a different assembly from a finish applied directly to porous masonry.
On painted brick, look for:
- Lifting edges
- Bubbles or blisters
- Cracks
- Powdering or chalking
- Glossy areas that may affect adhesion
- Soft or damp patches
- Stains returning through the coating
An intact coating may support a manufacturer-approved repainting system. A loose, failing, or unidentified coating requires further evaluation. Avoid a universal removal prescription: the appropriate preparation may depend on the coating’s chemistry, age, condition, underlying masonry, and location.
Then choose one of three project scopes.
1. Low-commitment refresh
- Clean sound masonry
- Refinish the existing mantel
- Replace or update a portable screen and accessories
- Simplify artwork and nearby decor
- Adjust lighting, rugs, or furniture
- Preserve the original brick finish
2. Brick refinishing
- Paint the sound outer surround
- Apply compatible limewash or diluted-paint whitewash
- Recolor compatible masonry with stain
- Add a mortar-based German smear
- Combine a brick finish with modest mantel or trim changes
3. Whole-fireplace renovation
- Replace or substantially alter the mantel
- Retile or rebuild the hearth
- Reface the surround
- Install or replace an insert
- Repair substantial masonry or chimney defects
- Change the fireplace’s construction, fuel, venting, or operation
Before choosing, decide how much original brick you want to preserve. Consider its color variation, irregular edges, mortar contrast, and texture. If those characteristics matter, an opaque coating may not be the best first move. If the brick color is the principal problem and variation matters less, paint may provide the visual reset you want.
Compare Paint, Limewash, Whitewash, Stain, and German Smear
These treatments are not interchangeable. They differ in opacity, texture, substrate requirements, application, maintenance, and difficulty of removal.
| Finish | Typical opacity | Brick variation retained | Texture change | Usually considered for | Preparation emphasis | Commitment | Approval to verify |
|---|---|---|---|---|---|---|---|
| Masonry paint | Medium to opaque | Low to moderate | Adds a surface coating without intentionally creating heavy texture | Sound bare brick or sound existing coatings when the system is compatible | Cleaning, drying, repairs, coating assessment, specified primer | High | Exact substrate and fireplace location |
| Traditional limewash | Translucent to visually solid | Moderate to high | Preserves the masonry profile beneath a mineral finish | Suitable bare, unsealed, porous masonry | Porosity, cleaning, directed dampening and application | Medium to high | Product and location |
| Diluted-paint whitewash | Translucent to medium | Moderate | Behaves as a thin surface coating | Substrates approved by the coating manufacturer | Cleaning, possible primer, permitted dilution | Medium to high | Coating and location |
| Penetrating masonry stain | Translucent recoloring | Often relatively high | Intended to preserve more texture than opaque paint | Compatible absorptive masonry | Sealer and absorption assessment, color testing | High | Brick, previous treatments, heat, and location |
| German smear | Variable | Brick remains visible in selected areas | Significant; mortar alters faces and joints | Sound masonry compatible with the mortar system | Cleaning, repairs, controlled moistening, small sections | Very high | Mortar system and location |
Masonry paint
Paint generally provides the most uniform color. It can unify mismatched brick and mortar, lighten a dark wall, or create a dark focal point. Its opacity can also reduce the natural color variation that makes individual bricks distinct.
Treat paint as a lasting alteration. Do not choose it on the assumption that the original surface can always be restored easily.
Traditional limewash
Traditional limewash is a lime-and-water mineral finish used on suitable porous masonry. It can produce tonal movement, irregular coverage, and visible brick variation. Some products permit selective distressing, but the method and working window belong to that product’s instructions rather than a universal rule.
Limewash should not be described as maintenance-free, universally reversible, or immune to wear. Its behavior depends on the product, substrate, preparation, application, moisture conditions, and environment.
Diluted-paint whitewash
Modern whitewash commonly refers to diluted paint applied so that some of the underlying brick remains visible. It behaves more like a thin coating than traditional mineral limewash. Paint EZ’s comparison distinguishes paint-based whitewash from limewash and identifies true German smear as a mortar treatment (limewash, whitewash, and German-smear comparison).
Do not copy a generic paint-to-water ratio from an unrelated project. Confirm whether the selected coating may be diluted, how much water is permitted, whether primer is required, and where the mixture may be applied.
Penetrating masonry stain
Penetrating masonry stain may recolor compatible masonry while preserving more texture and visual depth than opaque paint. However, the available example in the evidence is vendor-authored and centers on a limestone fireplace rather than a controlled study of brick performance (vendor-authored masonry recoloring example).
Treat stain as a product-specific option, not a guaranteed solution. Ask its manufacturer about your brick, mortar, sealer or previous treatment, expected heat exposure, and intended fireplace location.
German smear
True German smear uses prepared mortar. The mortar is spread over brick and partially removed or redistributed, leaving varying amounts on the faces and joints. It is not paint, diluted-paint whitewash, or limewash.
German smear changes texture as well as color. Assume that removal may leave residue or affect brick faces.
There is no universally best finish. Choose according to:
- Whether the brick is bare, porous, sealed, or painted
- How much natural color variation should remain
- Whether you want a flat color field or additional texture
- How much future maintenance or touch-up you will accept
- Whether later removal matters
- Whether a compatible product is available for the intended location
Cleaning and decor changes are comparatively low commitment. Paint, stain, and mortar treatments should be approached as lasting alterations.
Prepare Brick Without Concealing Problems or Damaging the Surface
Preparation affects both appearance and adhesion. It also exposes defects that soot, accessories, or furniture may have concealed.
Use this general sequence:
- Confirm that the fireplace is off and cool.
- Remove portable screens, tools, decor, and accessories without disturbing appliance or gas components.
- Protect floors, walls, woodwork, openings, and nearby furnishings.
- Vacuum loose dust, ash, and debris with suitable equipment.
- Inspect the newly exposed masonry.
- Clean with the gentlest effective method compatible with the brick and planned finish.
- Rinse or wipe the surface when the cleaner instructions require it.
- Ventilate as directed by the cleaner label.
- Allow the masonry to dry to the condition required by the finish system.
- Complete appropriate minor repairs and let them cure as instructed.
Use a natural stiff-bristled brush or another tool approved for masonry. Batchelder & Collins warns that wire or metal brushes can damage brick and also advises ventilation and protective equipment when stronger cleaners such as TSP are used (brick cleaning, chemical, and tool guidance).
No single cleaner is appropriate for every brick, coating, or stain. Start with a gentle compatible method and test it in a discreet location.
If the selected method uses trisodium phosphate or a TSP substitute, follow its label for dilution, ventilation, gloves, eye protection, rinsing, and disposal. Confirm that any cleaner residue is compatible with the intended primer, coating, limewash, stain, or mortar.
Do not combine cleaners unless their labels or manufacturers explicitly establish compatibility. If one cleaner fails, remove or rinse it as directed before considering another method.
Rather than applying a universal waiting period, follow the moisture and drying requirements for the selected finish and allow more time when cool, humid, or heavily saturated conditions warrant it.
Repair only defects within your competence. Minor, stable mortar imperfections may be suitable for a compatible repair method. Loose brick, extensive mortar loss, spalling, movement, broad cracking, or substantial deterioration should be referred to a qualified mason before refinishing.
A general supply checklist includes:
- Drop cloths or floor protection
- Painter’s tape, masking paper, and plastic sheeting
- A suitable vacuum and attachments
- A compatible cleaner
- A natural stiff-bristled or masonry-approved brush
- Buckets, clean water, sponges, and rinse materials when required
- Label-specified gloves and eye protection
- Ventilation equipment when directed
- Finish-specific brushes, rollers, trays, trowels, or spray equipment
- Materials for creating a representative test area
Stop if moisture returns after cleaning or if soot and staining cannot be identified confidently.
How to Paint a Brick Fireplace Surround
This workflow applies to sound decorative brick outside the firebox. It does not establish that paint is appropriate on the hearth, insert, metal trim, or any surface exposed to direct flame. Confirm the substrate and intended location against the written instructions for the primer and finish.
Painting sequence
- Confirm that the substrate is sound. Address appropriate repairs, moisture, and coating failure before painting.
- Clean the brick. Remove loose debris, dust, soot, and incompatible residue without damaging the surface.
- Allow it to dry. Use the coating system’s stated moisture and drying requirements.
- Mask the room. Protect the hearth, mantel, walls, floor, openings, trim, and appliance components.
- Apply the specified primer. Use the primer required for the masonry or existing coating and chosen finish.
- Apply thin finish coats. Work the coating into textured faces and joints without heavy buildup or runs.
- Observe the prescribed drying between coats.
- Follow the complete curing and return-to-service instructions before operating the fireplace.
Bare porous masonry and previously painted brick may require different systems. A coating manufacturer may require a dedicated bonding primer for an existing painted surface. Romabio, for example, specifies its own primer before its compatible mineral masonry finishes on pre-painted surfaces and notes that its traditional bare-masonry limewash effect cannot be reproduced directly over paint (manufacturer guidance for pre-painted fireplaces).
Choose tools according to the surface and room:
- Brush: Reaches corners, textured faces, edges, and mortar joints but can be slow over a large surround.
- Roller: Covers broad areas efficiently, provided its nap can reach the irregular surface.
- Sprayer: Can cover a large surface quickly but makes masking, overspray control, ventilation, and technique central to the project.
For spraying, protect floors, walls, ceilings, adjacent openings, vents, and nearby furnishings. Keep operational and serviceable components free of coating. Test and adjust the spray pattern on masking paper or another practice surface away from the brick. A single-homeowner project documents this masking and testing process, but its materials and fireplace configuration should not be generalized to every installation (sprayed fireplace makeover example).
A primer’s inclusion in a coating system does not, by itself, answer whether the finish belongs near fireplace heat. If the product literature does not address your substrate and location, obtain written clarification from the manufacturer rather than inferring suitability from ordinary interior-wall use.
Record the primer, finish, color, sheen, batch information, and application date. Keep a labeled dry sample if possible so later touch-ups do not depend on memory.
How to Apply Limewash, Whitewash, Stain, or German Smear
Test every proposed finish on a loose matching brick or an inconspicuous area. Make the sample large enough to show several brick faces and mortar joints, then evaluate it only after drying. Review it in daylight and evening light before committing to the entire surround.
Limewash workflow
Limit this general workflow to suitable bare, unsealed, porous masonry:
- Perform a preliminary water-absorption check.
- Confirm the substrate against the limewash instructions.
- Clean the brick and let it reach the condition specified by the product.
- Protect the mantel, hearth, walls, floor, and appliance components.
- Dampen the masonry only if and as directed.
- Mix or dilute according to the product instructions.
- Apply with the recommended masonry brush in manageable sections.
- Distress only when the instructions permit it and only within the stated working method.
- Let the sample dry before changing coverage.
Painted or sealed brick generally will not produce the same interaction as suitable bare porous masonry. Use only a system explicitly designed for the existing coating; do not assume a primer makes painted brick equivalent to bare brick.
Wear the gloves and eye protection specified on the limewash label. Retailer instructions for a featured limewash identify lime as caustic and recommend gloves while directing users to the product’s handling requirements (limewash handling and application guidance).
Diluted-paint whitewash workflow
A modern diluted-paint whitewash is a coating treatment, not traditional limewash. Before mixing anything, ask the coating manufacturer:
- Is dilution permitted?
- What dilution range is allowed?
- Is the coating compatible with bare, sealed, or painted brick?
- Is primer required?
- Is the mixture permitted at the intended fireplace location?
- Which application methods are approved?
- What drying, curing, and ventilation conditions apply?
After receiving those answers, prepare the substrate and build transparency gradually on a test area. Do not apply one universal water-to-paint formula across different coating chemistries.
Penetrating masonry stain workflow
Before purchasing stain, confirm:
- It is intended for your type of brick and mortar.
- Existing sealers, coatings, or cleaner residues will not prevent the specified application.
- The expected conditions fit the product’s documented uses.
- The manufacturer permits it in the intended fireplace location.
- Its likely color behavior on your masonry is understood.
Prepare a test area as directed and compare absorption across brick and mortar. Evaluate the dry color against the room’s walls, flooring, wood tones, and lighting.
Do not rely on broad claims that stain will be permanent, maintenance-free, or identical across all masonry. Ask how it is maintained and touched up, and whether later removal is realistic.
German smear workflow
German smear alters both color and texture:
- Confirm that the brick and mortar are sound.
- Clean the surface and remove loose material.
- Protect adjacent finishes and fireplace components.
- Moisten the masonry only as the selected mortar directs.
- Mix and handle the prepared mortar according to its instructions.
- Apply it in small, manageable sections.
- Partially remove or redistribute it to create the intended coverage.
- Cure it under the specified conditions.
Mortar selection, proportions, working time, application thickness, curing, and location suitability must come from the chosen system. Kenyon Noble’s retailer guide similarly describes cleaning and moistening the brick, applying prepared mortar in sections, partially removing it, and following the mortar instructions (German-smear process overview).
Wear the gloves and eye protection required by the mortar label.
Update the Mantel, Hearth, Insert, and Decor Without Repainting the Brick
If the masonry is sound but the fireplace feels dated, begin with the least permanent changes. They may provide enough improvement to avoid coating the brick.
A minimal refresh can include:
- Cleaning soot, dust, and debris
- Refinishing or replacing a worn mantel
- Updating the screen and portable accessories
- Removing undersized or crowded decor
- Repositioning artwork and lighting
- Reassessing the brick after editing the room
A painted wood mantel may accept a compatible interior coating after suitable preparation. A stained mantel may be lightly sanded and restained when the wood, existing finish, and new system allow it. First determine whether it is solid wood, veneer, engineered material, masonry, or another substrate.
Use design choices to connect the fireplace to the room:
- Scale: Relate the mantel and artwork to both the masonry wall and the room.
- Color: Repeat or complement undertones in the flooring, furniture, walls, and brick.
- Shape: Coordinate the opening, mantel, artwork, lighting, and shelving.
- Material: Make wood, metal, stone, and painted finishes feel intentional together.
- Negative space: Leave enough clear area for the fireplace to read as one composition.
- Lighting: Judge proposed colors in both daylight and evening light.
Mantel replacement is more than a finish change. Before installation, verify the mantel’s weight, supporting substrate, hidden framing, masonry condition, attachment requirements, and placement relative to the operating fireplace.
Hearth and surround changes are also higher-scope projects. Before considering an overlay, determine whether:
- The existing substrate is stable rather than cracked or moving
- Its flatness is suitable for the proposed finish
- The bonding system is intended for both the existing and new materials
- The materials are documented for the proposed location
- Added thickness will interfere with doors, vents, trim, insert removal, or service access
- Exposed edges can be finished properly
- The completed assembly remains consistent with the fireplace or insert instructions
One homeowner project tiled over an existing marble hearth and refinished metal components after a professional disconnected the gas line. That example documents one installation, not a general rule that every hearth can accept tile or every metal component can be coated (single-homeowner hearth and insert makeover).
Use a coating on metal trim or an appliance component only when the coating instructions and the component or appliance documentation permit it.
Do not remove, disconnect, modify, or reconnect a gas insert or gas line as a cosmetic DIY step.
Treat the Fireplace as Separate Heat and Safety Zones
Divide the fireplace into zones before selecting any material.
| Zone | Questions to verify |
|---|---|
| Firebox | What materials and repairs are permitted for the fireplace construction and operating conditions? |
| Hearth and hearth extension | What materials, dimensions, substrate conditions, and installation methods apply? |
| Surrounding masonry | Is the brick sound, porous or coated, dry, clean, and compatible with the selected finish? |
| Insert and metal trim | What does the appliance documentation permit, and which vents, labels, controls, and service areas must remain accessible? |
| Mantel | What placement, projection, weight, attachment, and surrounding construction must be considered? |
| Adjacent wall or built-ins | Could the work affect framing, wiring, ventilation openings, appliance access, or surrounding finishes? |
These zones do not necessarily experience the same conditions. A coating considered for the outer surround should not automatically be extended onto the hearth, metal trim, or inside the firebox.
No decorative coating, adhesive, tile, mortar, trim, or wood component is automatically suitable throughout a fireplace assembly.
Use this verification order:
- Identify the fireplace or insert and locate its manual when applicable.
- Check the documentation or listing information for the appliance and affected components.
- Read the written instructions for every coating, mortar, adhesive, tile system, or trim product.
- Ask the local authority whether project-specific requirements, permits, or inspections apply.
- Obtain an on-site professional assessment when the construction or operating configuration remains uncertain.
Avoid universal internet figures for mantel placement, hearth dimensions, temperature limits, or permit thresholds. The evidence supplied for this guide does not establish those technical details for a particular fireplace.
Professional involvement is appropriate when work includes:
- Structural or extensive masonry repair
- Loose, moving, or extensively spalled brick
- Suspected chimney, liner, flue, or damper defects
- Persistent moisture or unexplained recurring staining
- Gas disconnection, modification, or reconnection
- Insert removal, installation, or servicing
- Major refacing or alteration of the opening
- Uncertain ventilation
- Unresolved appliance-placement or material questions
- Work that changes the fireplace’s construction or operation
Before a substantial renovation, ask the local building authority, appliance manufacturer, qualified fireplace professional, and—where relevant—your insurer what project-specific approvals or documentation are needed. Contractor renovation guidance similarly advises checking local requirements and insurer expectations before major work while using qualified professionals for structural, gas, and specialized fireplace installation (fireplace renovation planning guidance).
General online guidance cannot establish compliance or safe operation for an individual fireplace. The relevant manuals, product instructions, local requirements, and on-site conditions must control.
Build a Realistic Project Plan Before You Begin
Build the budget from project categories rather than a generic price promise. Allow for:
- Initial fireplace, masonry, or chimney assessment
- Masonry repairs or moisture investigation
- Cleaning supplies and protective equipment
- Primer, finish, mortar, stain, and sample materials
- Brushes, rollers, trays, trowels, or equipment rental
- Masking and floor protection
- Mantel or hearth work
- Appliance or eligible metal-component work
- Project-specific permits or inspections, if required
- Waste handling and disposal
- Qualified specialist labor
- Contingency for conditions exposed during cleaning or removal
The schedule depends on the fireplace’s condition and scope. Repairs may need to precede cleaning. Cleaned masonry must reach the condition required by the finish. Samples need to dry before they can be judged, and coatings, mortar, adhesives, or grout may have separate curing requirements. Professional availability can also affect the sequence.
Reject blanket promises that every fireplace makeover is inexpensive, beginner-friendly, or achievable in a weekend. Cleaning and editing decor are not comparable to masonry repair, hearth reconstruction, refacing, or insert work.
Use this sequence:
- Assess the complete fireplace.
- Obtain professional evaluations where needed.
- Complete necessary masonry, moisture, chimney, ventilation, or appliance work.
- Clean the surfaces.
- Test porosity and coating condition.
- Confirm product compatibility.
- Apply a representative sample.
- Evaluate the dry sample in daylight and evening light.
- Apply the approved brick finish.
- Complete compatible mantel or hearth work without damaging the finish.
- Reinstall permitted trim and portable accessories.
- Inspect the completed work.
- Follow all curing and return-to-service instructions.
Before buying a product, ask its manufacturer:
- Is it intended for this exact substrate?
- Does the documentation address this fireplace location?
- Is it compatible with the existing paint, sealer, cleaner, or repair material?
- What cleaning and preparation are required?
- Is a primer required, and which one?
- May the product be diluted or distressed?
- What tools and application thickness are specified?
- What ventilation and protective equipment are required?
- What drying and curing conditions apply?
- What must happen before the fireplace returns to service?
- How is the finish cleaned, maintained, and touched up?
- Can it be removed later, and what would removal involve?
- Are there restrictions involving heat, flame, soot, vents, or appliance components?
Then compare the task with your skills and the consequences of getting it wrong.
| Task | Reasonable DIY candidate when… | Hire or consult a professional when… |
|---|---|---|
| Routine cleaning | Masonry is sound, the stain is understood, and the cleaner is compatible | Moisture or staining returns, or soot may reflect an operating problem |
| Cosmetic surround painting | Work is outside the firebox, the substrate is sound, and the complete coating system is documented for the location | Existing paint is failing or unidentified, or location suitability remains uncertain |
| Limewashing | Brick is sound, bare, porous, and compatible with the chosen product | Brick is painted or sealed, results remain unpredictable, or masonry needs repair |
| Mantel refinishing | The mantel remains securely installed and only its finish is changing | It is loose, damaged, unusually close to the opening, or made from an uncertain material |
| Masonry repair | Only minor, stable cosmetic work is involved and a compatible method is known | Brick is loose, spalled, moving, extensively cracked, or moisture-affected |
| Hearth overlay | The substrate, bonding method, added thickness, edges, and location requirements have been verified | The base is cracked, hollow, uneven, unstable, or of uncertain construction |
| Heavy mantel installation | Load, support, attachment, and placement have been technically verified | Hidden structure is unknown or the mantel is heavy or difficult to anchor |
| Chimney work | Not generally part of a cosmetic surface makeover | Use an appropriately qualified chimney professional |
| Gas or insert work | Not a casual cosmetic DIY task | Use a qualified gas technician or fireplace specialist |
The condition-first decision is simple: preserve and clean sound brick for the least permanent update. If recoloring is necessary, choose a finish compatible with the actual substrate, confirm its intended location, and test it before committing. Coordinate the masonry with the mantel, hearth, screen, lighting, and proportions of the room.
Stop before work involving damaged masonry, uncertain heat exposure, chimney or ventilation concerns, gas components, or unresolved installation requirements. The best makeover is not necessarily the most dramatic; it is the one that suits the existing masonry without compromising the fireplace assembly.
Frequently Asked Questions
Is it better to paint or limewash a brick fireplace?
Neither is universally better. Paint generally provides more uniform, opaque coverage and can conceal much of the original color variation. Limewash can retain more tonal movement when used on suitable bare, porous masonry.
Choose paint when you want a consistent color and have a compatible coating system for the substrate and intended location. Consider limewash when the brick is unsealed and porous, you prefer a varied mineral appearance, and the product instructions support the application. Test either option after complete drying and consider how difficult future removal may be.
Can limewash be applied over an already painted brick fireplace?
Traditional limewash should not be expected to behave on painted brick as it does on bare porous masonry because the existing coating separates the finish from the brick’s pores.
Some manufacturers offer primers and decorative mineral coatings for pre-painted surfaces. Use only a complete system designed for the existing coating and intended location. Do not apply a bare-masonry limewash method over paint and assume that it will produce the same effect or adhesion.
Can I use ordinary paint or decorative finishes inside the firebox?
Do not infer firebox suitability from a product’s use on an outer masonry surround or interior wall. The supplied evidence does not establish ordinary paint, decorative limewash, stain, generic mortar, or common adhesive as suitable inside every firebox.
Identify the fireplace construction and use only materials documented for that application. Follow the fireplace documentation and the material manufacturer’s written instructions. If the requirements are unclear, consult a qualified fireplace or masonry professional rather than experimenting inside the firebox.
Can I install tile over an existing fireplace hearth?
Possibly, but a successful installation in one home does not establish that every marble, tile, concrete, or masonry hearth is suitable for an overlay.
Before proceeding, verify the existing surface’s stability, flatness, material, bonding requirements, added thickness, edge treatment, and relationship to doors, vents, trim, insert removal, and service access. If the substrate is cracked, moving, hollow, moisture-affected, or of uncertain construction, have it evaluated first.
When should I hire a mason, chimney professional, fireplace specialist, or gas technician?
Hire a qualified professional when the project involves loose or moving brick, extensive spalling, substantial mortar deterioration, significant cracking, recurring moisture, suspected chimney or flue defects, uncertain ventilation, major refacing, insert work, or unresolved appliance-installation questions.
A mason is appropriate for extensive or structural masonry repairs. A chimney professional can evaluate chimney, liner, flue, and damper concerns. A fireplace specialist can address appliance installation and service requirements. A qualified gas technician should handle gas-line or gas-appliance disconnection, modification, and reconnection.