
How a Brick-Built Chimney Works—and How to Tell When It Needs Attention
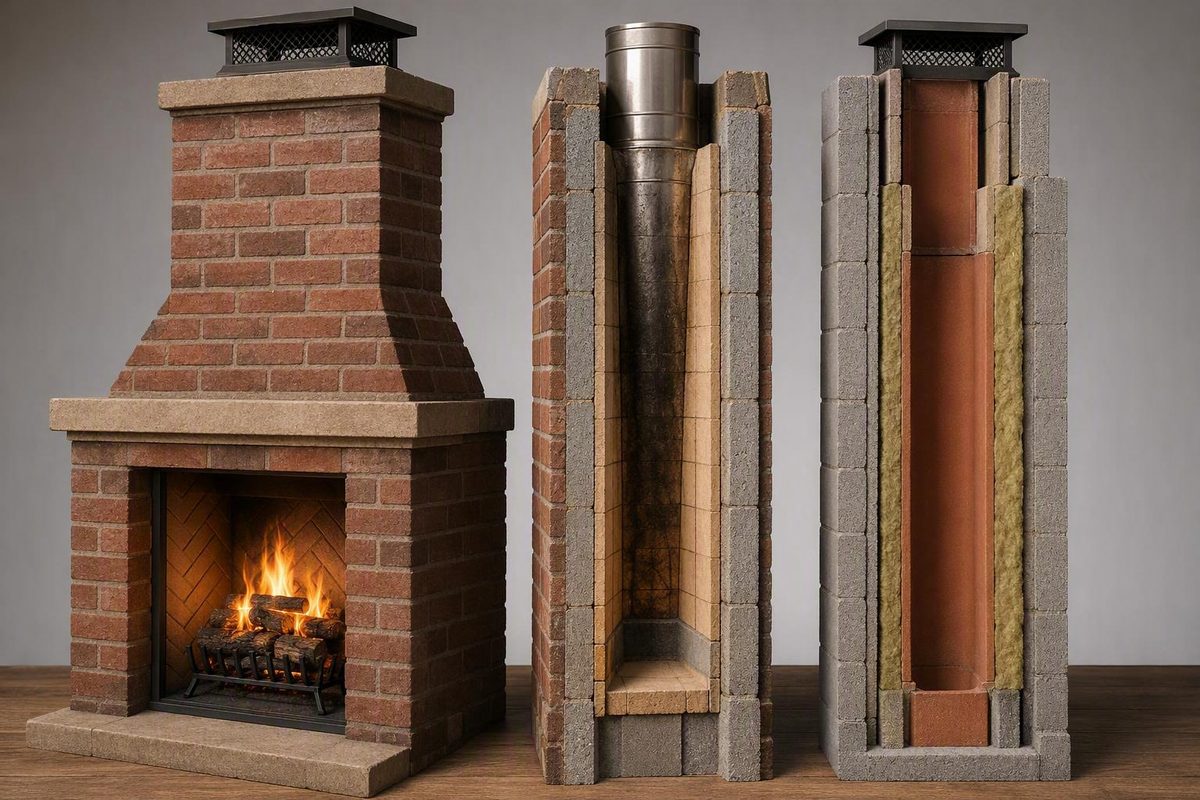
A masonry chimney is easy to mistake for a simple stack of brick. In reality, it is three systems occupying the same space:
- A structural assembly carrying substantial weight from its footing to its top.
- A combustion-venting system carrying smoke, heat, and gases away from a fireplace or appliance.
- Part of the building’s weather barrier, managing rain and runoff where the chimney passes through the roof.
A defect in one system can affect the others. Water entering through a failed crown can deteriorate mortar, corrode metal components, and damage the roof assembly. A stable-looking exterior can conceal a cracked liner. Poor draft may originate in the chimney, the appliance, an obstruction, or pressure conditions inside the house.
Understanding these relationships helps you identify the type of chimney you have, recognize warning signs without overdiagnosing them, and choose the right professional for inspection or repair.
What Counts as a Masonry Chimney?
A conventional masonry chimney is built on site from materials such as brick, stone, concrete block, concrete, and mortar. Its masonry shell is a structural part of the chimney rather than merely a decorative covering.
That definition separates four systems that may look similar from the ground:
| Chimney category | How it is constructed | Important distinction |
|---|---|---|
| Site-built masonry chimney | Built in place from brick, stone, concrete block, concrete, and mortar | The masonry forms the chimney structure |
| Proprietary modular masonry system | Assembled from manufacturer-designed masonry or masonry-like components | Installation must follow that product’s listing and instructions |
| Factory-built metal chimney | Assembled from listed manufactured chimney sections | Components, supports, clearances, enclosure, and termination are part of the tested system |
| Framed chase with masonry veneer | A framed enclosure contains a factory-built chimney or vent and is faced with brick or stone | The visible masonry is cladding, not the primary chimney structure |
Exterior brick is therefore a clue, not proof. A framed chase may be covered with masonry veneer, while a factory-built fireplace may sit behind a traditional-looking façade. Identification can require examining the fireplace opening, appliance label, attic or chase, cleanout area, visible flue construction, and installation documents.
Look for evidence rather than relying on appearance:
- A site-built brick firebox and smoke chamber often indicate traditional masonry fireplace construction.
- Clay flue tiles visible at the top suggest a masonry flue, but do not establish the chimney’s full construction or condition.
- A round metal chimney inside a framed chase usually indicates a factory-built system.
- A metal data plate in or near the fireplace can identify a listed factory-built unit.
- Appliance documentation may specify a masonry chimney, listed liner, pellet vent, gas vent, or another approved system.
There is also a middle category: proprietary modular masonry. For example, Mason-Lite describes a system made from paired inner and outer pumice components that must be used together. Its support, offset, damper, and upper-story restrictions belong to that particular product and should not be transferred to a conventional brick-and-mortar chimney (Mason-Lite masonry chimney system).
Once the chimney type is established, evaluate it through the same three-part framework:
- Is it adequately supported and structurally stable?
- Is its flue suitable for the connected fireplace or appliance?
- Do its cap, crown, masonry, and roof details keep water out?
Those questions are more useful than asking whether the visible brick simply “looks good.”
Masonry Chimney Anatomy: Structure, Venting, and Weather Protection
A chimney cross-section makes more sense when its parts are grouped by function rather than memorized as a disconnected glossary.
A simplified section looks like this:
                         FLUE CAP / RAIN CAP
                               │
                     ┌─────────┴─────────┐
                     │  SLOPED CROWN     │  ← drip edge at outer edge
                     │  flexible joint   │
                     └──────┬───────┬────┘
                            │ LINER  │
                     ┌──────┴───────┴────┐
                     │   MASONRY SHELL   │
                     │                   │
       roof slope →  │                   │
               ──────┤ FLASHING          │
           cricket → ▲ on uphill side where applicable
                     │      FLUE         │
                     │                   │
                     │   SMOKE CHAMBER   │
                     │      DAMPER       │
                     │    SMOKE SHELF    │
                     │                   │
                     │      FIREBOX      │
                     │___________________│
                      HEARTH EXTENSION
                             │
                    FOOTING / FOUNDATION
The drawing is conceptual, not a construction detail. Actual dimensions, clearances, reinforcement, connections, and roof integration depend on the chimney, appliance, building, and governing requirements.
1. Structural support
Footing or foundation: The footing spreads the chimney’s considerable weight into suitable soil or another designed support. A masonry chimney should not simply rest on ordinary floor framing unless the complete assembly has been engineered for that condition.
Masonry shell: Brick, stone, concrete, or masonry block encloses the flue and provides the main vertical structure. It must remain stable under its own weight and the environmental loads applicable to the building.
Mortar joints: Mortar binds the masonry units and helps distribute loads. Cracked, washed-out, recessed, or loose joints can admit water and may indicate deterioration or movement.
Lintel: At a masonry fireplace opening, the lintel spans the top of the opening and supports the masonry above it.
Reinforcement and anchorage: Requirements can depend on the chimney’s dimensions, location, seismic design category, and relationship to the building. Reinforcement and anchorage are design-controlled features, not universal add-ons.
2. Combustion venting
Firebox: The combustion chamber of a traditional masonry fireplace. Its firebrick and refractory joints face high temperatures and should not be treated as ordinary decorative masonry.
Hearth extension: The noncombustible area extending into the room in front of—and sometimes beside—the firebox opening. It separates the firebox from adjacent room finishes.
Smoke shelf: The area behind or below the smoke chamber. It may collect fallen debris and is part of the fireplace’s airflow geometry.
Damper: A movable control between the firebox and smoke chamber in many open fireplaces. Its correct position depends on the installed fireplace or appliance.
Smoke chamber: The transition that narrows the broad firebox opening toward the flue. Its shape and condition affect how combustion products enter the flue.
Flue: The passage through which combustion products travel outdoors.
Liner: The material forming or protecting the inside of that passage. Clay tile, a listed metal lining system, and an approved cast-in-place system are possible examples, but they are not automatically interchangeable.
Thimble or appliance connection: The opening and fitting through which a stove, boiler, furnace, or other appliance connector enters a masonry flue. Its geometry, material, position, and clearances must suit the appliance.
A single masonry chimney can contain multiple flues. One might serve a fireplace, another a heating appliance, and another may be abandoned. Each passage and connection must be identified and evaluated for its actual use; sharing one masonry shell does not make the flues interchangeable.
3. Weather protection
Flue cap or rain cap: Covers the flue opening while preserving the outlet area required by the system. Depending on its design, it can limit direct rain entry and help exclude animals and debris.
Crown: The sloped surface covering the top of the masonry shell around the flue openings. Its job is to direct water away from the masonry below.
Bond break and flexible joint around the liner: The liner and crown can move differently as their temperatures change. The top detail should accommodate that movement rather than rigidly locking the liner into the crown.
Drip edge: An overhanging edge or groove that encourages runoff to fall clear instead of clinging to the chimney face.
Flashing: The layered roof-to-chimney detail that keeps water from entering where the chimney passes through the roof.
Cricket: A small peaked diversion on the uphill side of some chimneys. It directs runoff around the chimney rather than allowing water and debris to collect behind it. Whether one is required or appropriate depends on chimney width, roof geometry, and governing requirements.
These components solve different problems. A cap does not repair a cracked crown. A new crown does not correct failed step flashing. Sealant at the roof line does not replace properly integrated flashing. A cricket redirects uphill runoff but does not repair deteriorated brick.
The most commonly confused terms are straightforward:
- The flue is the passage.
- The liner forms or protects that passage.
- The crown covers and sheds water from the top of the masonry.
- The cap covers the flue opening.
How Draft and the Flue Liner Make the System Work
A natural-draft masonry chimney does not mechanically “suck” smoke from a fireplace. During operation, gases in the flue are generally warmer and less dense than the outside air. As they rise, pressure differences help draw replacement air toward the fire or appliance and move combustion products upward.
Many variables affect that process:
- Chimney height and termination location
- Flue cross-sectional area and shape
- Firebox opening and smoke-chamber geometry
- Appliance design and firing rate
- Exhaust-gas temperature
- A cold flue exposed on an exterior wall
- Liner roughness, offsets, gaps, or damage
- Soot, creosote, nests, debris, or fallen tile
- Wind and nearby roof forms
- Air pressure inside the house
A fireplace may spill smoke even when the chimney is tall enough. Kitchen exhaust, bath fans, clothes dryers, furnaces, and other equipment can remove air from the building. In a tightly sealed home, the fireplace may then compete for replacement air, contributing to weak draft or back-drafting. Draft problems should therefore be diagnosed as a chimney, appliance, and whole-building issue rather than automatically blamed on chimney height (masonry-chimney draft factors).
The familiar 3-2-10 rule addresses termination geometry: the chimney commonly must extend at least 3 feet above the highest point where it penetrates the roof and at least 2 feet above building portions within 10 feet. That geometry does not guarantee good draft or complete code compliance; flue size, appliance compatibility, obstructions, pressure conditions, and local requirements still matter (2021 Illinois masonry-chimney provision).
Why the liner matters
A liner provides the intended internal path for heat and combustion products. It also separates flue conditions from surrounding masonry and nearby building materials. A masonry chimney serving a fireplace or combustion appliance generally requires a full-length lining system suitable for the appliance, fuel, operating conditions, appliance listing, manufacturer instructions, and governing code.
Selection begins with the application:
- Wood fireplaces and stoves can produce high flue temperatures and combustible deposits. Flue size and configuration must suit the specific fireplace or appliance.
- Gas appliances vary widely. Some may use an approved lining arrangement in a masonry chimney, while others require B-vent, direct vent, or another listed system.
- Pellet appliances generally require a listed pellet-vent system or a lining arrangement specifically approved for installation in a masonry chimney.
- Oil-fired appliances have application-specific sizing, temperature, corrosion, and code considerations.
Clay tile, stainless steel, cast-in-place lining, and other approved systems should not be ranked in isolation. The correct choice is the system approved for the connected appliance and the actual flue conditions.
Defects that merit professional evaluation include:
- Cracked or missing liner sections
- Gaps or voids at tile joints
- Fallen tile or mortar fragments
- A blockage or substantial deposit
- Suspected heat or chimney-fire damage
- Liner material unsuitable for the appliance
- A flue that is improperly sized or configured
- A connector that protrudes into or improperly enters the flue
Damaged, missing, obstructed, or unsuitable lining can allow smoke, heat, or gases to leave the intended passage and may increase fire or carbon-monoxide risk. Such conditions should be evaluated before further use (masonry chimney and liner overview).
Do not connect a new stove, insert, pellet appliance, gas appliance, or heating unit to an old flue merely because an opening is available. Before conversion, verify the liner’s material, continuity, dimensions, temperature suitability, connection arrangement, and compatibility with the new appliance documentation.
Construction and Code Principles Homeowners Should Recognize
This is a code-awareness overview, not a construction specification. Requirements vary with jurisdiction, code edition, amendments, appliance type, product listing, seismic conditions, and building design. The currently adopted local code and authority having jurisdiction control.
Support begins below the chimney
Masonry is heavy. Its load needs a continuous, adequate path to a footing, foundation, or specially designed structure. Movement or settlement below can appear farther up as cracked mortar, separation at roof details, leaning, or displaced flue components.
A chimney should not carry unrelated structural loads unless it was designed to do so. Roof beams, floor framing, or additions should not casually bear on chimney masonry.
As an attributed example—not a nationwide rule—the reproduced 2021 Illinois Building Code requires, within that section’s scope, masonry-chimney footings at least 12 inches thick and extending at least 6 inches beyond the supporting foundation or wall on every side. The same provision specifies a nominal masonry wall thickness of at least 4 inches, prohibits the chimney from supporting unrelated loads unless designed for them, and requires lining suitable for the connected appliance, its listing, and instructions (Illinois Building Code Section 2113 reproduction).
Height is only one part of compliance
The commonly cited roof-termination geometry is:
- At least 3 feet above the highest point where the chimney passes through the roof, and
- At least 2 feet higher than building portions within 10 feet.
Local amendments and appliance requirements may add to or alter what applies. Meeting this geometry does not establish that the flue is correctly sized, properly lined, sufficiently separated from combustible construction, structurally sound, or suitable for the appliance.
Reinforcement, anchorage, and offsets are project-specific
Reinforcement and anchorage may depend on seismic design category, chimney width and height, floor and roof locations, and the surrounding building. Existing unreinforced masonry may also respond differently from modern reinforced construction when the building moves.
An offset is not an informal bend inserted wherever framing is inconvenient. Their angle and construction must follow applicable design requirements.
Manufacturer-specific modular systems may use proprietary offset pieces and support intervals. Those details must not be transferred to a conventional masonry chimney. The same caution applies to upper-story installations and heavy brick or stone facing.
New chimneys, major height changes, visible movement, questionable foundations, unusual offsets, or substantial new facing may require structural engineering. Permits and inspections may also be required by the local authority.
Project verification checklist
Before construction, major repair, relining, or appliance conversion, verify:
- [ ] The appliance listing and installation manual
- [ ] Approved chimney or venting options
- [ ] The current locally adopted code and amendments
- [ ] Permit and inspection requirements
- [ ] Requirements of the authority having jurisdiction
- [ ] Footing and foundation capacity
- [ ] Floor, roof, and lateral support where applicable
- [ ] Required clearances to combustible construction
- [ ] Approved liner material, size, and temperature rating
- [ ] Connection details for every appliance
- [ ] Termination height and roof geometry
- [ ] Required final inspection or approval before operation
Water Is the Main Exterior Enemy
A masonry chimney is unusually exposed. It projects above the roof, has horizontal or nearly horizontal surfaces at the top, contains joints between different materials, and penetrates the building envelope. Water can enter through several places at once.
A typical moisture pathway begins with one or more of the following:
- A missing, loose, or poorly configured cap
- A cracked, deteriorated, or nearly flat crown
- A failed joint between the crown and flue liner
- Open mortar joints or porous, damaged masonry
- Failed step flashing or counterflashing
- Damaged roofing near the penetration
- Water or debris collecting uphill of the chimney
Water may then move into the masonry shell, descend beside a liner, enter the smoke chamber or firebox, reach roof sheathing and framing, or appear on ceilings and walls.
A properly formed crown slopes away from the flues and projects so that it sheds water. A drip edge helps runoff fall clear rather than wrap underneath and stream down the chimney face. Flashing manages the moving intersection between roof and chimney. Where roof geometry makes water accumulation a concern, a cricket can split and divert runoff around the uphill side.
Moisture can contribute to:
- Washed-out or crumbling mortar joints
- Crown cracking and displacement
- Corrosion of dampers, caps, fasteners, and other metal
- Water stains and damaged interior finishes
- Deterioration of roof decking
- Flaking or broken brick faces
Spalling is the flaking, peeling, or breaking away of brick or mortar surfaces. Spalling is a symptom, however—not a complete diagnosis of where the water entered or whether the masonry can be repaired locally.
What common moisture symptoms may mean
| Symptom | Possible causes | What it does not prove |
|---|---|---|
| White staining on brick | Moisture carrying salts to the surface; recurring wetting; runoff patterns | One specific leak location |
| Water in the firebox | Direct rain through an open flue; cap problem; crown defect; flashing leak; masonry absorption | That a cap alone will solve it |
| Ceiling or wall stains near the chimney | Flashing failure; roof damage; crown or masonry leak; condensation | That the chimney is the only defective component |
| Rusted damper or metal parts | Recurring water entry; condensation; cap or crown damage | The exact entry point |
| Loose crown material | Freeze-thaw deterioration; movement; poor bond; incompatible prior work | That a surface coating is sufficient |
| Missing or recessed mortar | Weathering; moisture; movement; incompatible mortar | That repointing is the only required repair |
| Flaking brick | Saturation and freeze-thaw exposure; incompatible coatings; material deterioration | Whether the underlying structure is stable |
A chimney leak often crosses trade boundaries. A chimney specialist may need to assess the cap, crown, flues, and masonry while a roofer evaluates step flashing, counterflashing, shingles, underlayment, and decking. In one published field demonstration, crown deterioration, damaged brick faces, suspected flashing leakage, and roof-deck damage appeared together—an example of why assigning an entire leak to one component can miss the actual scope (chimney inspection field demonstration).
A breathable, masonry-compatible water repellent may sometimes be a finishing measure after defects have been corrected. It is not a substitute for repairing active crown cracks, rebuilding unstable masonry, replacing failed flashing, or correcting liner damage.
A Safe Homeowner Check—and the Signs That Mean Stop Using It
A homeowner can perform a useful visual check from the ground and from safely accessible interior areas. Do not climb onto a steep roof, lean a ladder against questionable masonry, remove fixed components, or enter confined spaces.
Use binoculars or a camera zoom for the upper chimney. Record observations with dated notes and photographs so changes can be compared and shown to the appropriate professional.
Exterior visual checklist
From the ground or another safe location, look for:
- A missing, tilted, corroded, or visibly damaged cap
- Visible crown cracks, missing pieces, or vegetation
- A chimney that appears to lean, twist, or bulge
- Large cracks crossing bricks and mortar joints
- Spalled, loose, or missing bricks
- Recessed, cracked, or missing mortar
- White staining or unusual runoff patterns
- Rust streaks below metal components
- Visible gaps at the roof-to-chimney joint
- Staining or sagging on the roof near the chimney
- Fallen brick, mortar, crown, or tile fragments
Interior visual checklist
With the fireplace or appliance completely cool and unused, look for:
- Cracked or loose firebrick
- Deteriorated refractory joints
- A damper that is corroded, jammed, or visibly damaged
- Visible liner gaps, cracks, or fragments in accessible areas
- Debris in the firebox, smoke shelf, or cleanout
- Heavy soot or black, shiny, tar-like deposits
- Water stains, dampness, rust, or peeling finishes
- Persistent smoky, musty, or tar-like odors
- Loose or damaged appliance connectors
- Evidence that smoke has entered the room
Black, sticky, or tar-like creosote is combustible, and blockages or damaged components can interfere with the intended movement of combustion products. A visual homeowner check does not replace professional inspection of hidden areas (homeowner masonry-chimney inspection guide).
A homeowner check cannot rule out concealed liner cracks, missing clearance to framing, voids behind masonry, chimney-fire damage, footing movement, or decayed roof decking. An apparently clean firebox does not establish that the full flue is unobstructed or suitable for use.
Triage: monitor, arrange service, or stop using
| Level | Observable examples | Appropriate response |
|---|---|---|
| Monitor and maintain | Surface staining with no active leak; limited weathering that is not changing; loose exterior debris unrelated to the chimney structure | Photograph the condition, track changes, and keep professional inspection current |
| Arrange prompt professional service | Crown cracks; missing mortar; flaking brick; recurring odor; rust; water stains; damaged cap; visible roof-junction gaps; deposits of uncertain extent; damper trouble | Avoid postponing evaluation, particularly before the next period of use |
| Stop using immediately | Carbon-monoxide alarm; smoke entering the room or persistent back-drafting; suspected chimney fire; known damaged or missing liner; falling flue-tile fragments; blocked flue; major cracks; leaning or bulging masonry; falling masonry | Stop operating the fireplace or appliance and obtain qualified or emergency help as appropriate |
If an active chimney or building fire is suspected, leave and contact emergency services. Do not attempt improvised combustion or fire troubleshooting; carbon monoxide can cause serious injury or death, and blocked or damaged venting can allow combustion products to enter the home (chimney draft and carbon-monoxide safety overview).
A chimney fire is not always dramatic. A suspected past event can justify a more detailed professional evaluation before reuse even if no one saw flames at the chimney top. Video examination is one possible method for investigating concealed damage after a suspected event (chimney-fire and masonry-damage guidance).
Inspection, Cleaning, and Repair Paths
Inspection and sweeping are related but not identical:
- Inspection evaluates condition, suitability, and possible hazards.
- Sweeping removes deposits or obstructions.
A chimney can need inspection without requiring much cleaning, and it can need cleaning even when the visible masonry appears sound. Periodic professional inspection is broadly supported, but sweeping frequency should reflect deposits, fuel, use, appliance instructions, and observed condition rather than an unconditional calendar rule.
A professional assessment may need to evaluate:
- Flue dimensions and configuration
- Liner material, joints, continuity, and condition
- Soot, creosote, debris, nests, or other obstructions
- Appliance connector or thimble
- Evidence of overheating or a chimney fire
- Firebox, smoke chamber, damper, and hearth
- Masonry stability and mortar condition
- Crown, cap, flashing, and moisture pathways
- Clearances and support where accessible
- Suitability for the current or proposed appliance
The correct inspection scope depends on the system’s history, accessibility, use, and observed conditions.
Matching the repair to the defect
| Repair path | Typically addresses | Does not automatically correct |
|---|---|---|
| Repointing | Failed mortar joints where masonry units remain serviceable and stable | Liner damage, footing movement, displaced walls, failed flashing |
| Crown repair or replacement | Cracked, loose, poorly shedding, or failed top protection | Roof-junction leaks or unstable chimney walls |
| Flashing work | Water entry at the chimney-to-roof intersection | Crown failure, porous masonry, or internal flue defects |
| Relining | A damaged, missing, unsuitable, or improperly sized liner; some appliance conversions | Foundation settlement or unstable exterior masonry |
| Reinforcement or partial rebuilding | Localized movement or deterioration where sound material can be retained | Extensive displacement or inadequate foundation capacity |
| Complete rebuilding | Damage, movement, or loss of integrity too extensive for limited repair | Appliance compatibility unless the new flue is designed for the intended appliance |
Repointing deserves particular caution because it is often recommended from photographs. Proper repointing removes failed mortar and installs compatible replacement mortar. It does not stabilize a moving footing, reconnect separated liner tiles, rebuild a displaced wall, or repair roof flashing.
Relining is similarly application-specific. Listed stainless-steel systems and approved cast-in-place systems are possible approaches, not universally superior answers. Selection depends on the appliance, fuel, flue shape and condition, required size, listing, temperature exposure, available clearances, and local approval. A new liner also cannot make an unstable masonry structure sound.
Visual symptoms alone rarely establish whether the correct remedy is repointing, crown work, flashing repair, relining, reinforcement, or rebuilding. Diagnosis may require flue imaging, masonry examination, moisture tracing, roof inspection, and structural evaluation.
Which professional handles what?
Chimney professional: Flue inspection, deposits, obstructions, liner condition, draft concerns, chimney-fire assessment, and appliance-to-flue suitability.
Mason: Mortar, brick, stone, crown, firebox masonry, and rebuilding—provided the cause and scope of deterioration are understood.
Roofer: Step flashing, counterflashing, roofing, underlayment, crickets, and roof-deck damage.
Structural engineer: Foundation capacity, settlement, leaning, major cracking, reinforcement, unusual offsets, added facing, upper-story support, or substantial reconstruction.
These roles can overlap. A leaking, leaning chimney may need coordinated findings rather than one contractor addressing only the portion within that trade.
DIY work should remain narrow. Structural masonry, liner installation, appliance connections, unstable chimneys, concealed leaks, suspected chimney-fire damage, and steep-roof access are not appropriate trial-and-error projects. Even apparently simple cap or crown work becomes hazardous when access is difficult or the flue tile and surrounding masonry are brittle; published DIY guidance likewise advises professional help when the crown cannot be reached safely or the roof is steep (chimney maintenance and roof-access guidance).
Masonry vs. Factory-Built Chimneys: Choosing or Converting Safely
Neither masonry nor factory-built construction is universally better. Both move combustion products outdoors, but they do so through different construction systems.
| Factor | Masonry chimney | Factory-built metal chimney |
|---|---|---|
| Construction | Built on site from masonry materials, generally around one or more lined flues | Assembled from listed manufactured sections |
| Structural load | Substantial; requires adequate footing and support | Lighter, but still requires listed supports and suitable framing |
| Installation constraints | Foundation, masonry work, roof integration, weather exposure, and structural design | Approved routing, clearances, supports, enclosure, and listed components |
| Appearance | Traditional masonry appearance with broad architectural customization | May be exposed or enclosed in an architectural chase |
| Repair access | Exterior masonry is visible, but internal defects may be difficult to reach | Sections and connections need inspection; chase construction may limit access |
| Weather concerns | Crown, mortar, brick, cap, and flashing can deteriorate | Cap, flashing, chase cover, joints, and metal condition require attention |
| Compatibility | Depends on approved liner, flue size, configuration, and appliance | Depends on the tested chimney or vent listing and appliance approval |
Masonry’s weight and on-site construction may suit a traditional architectural form or custom geometry, but they increase foundation and support demands. Factory-built systems reduce masonry load and are installed as tested assemblies, but their components should not be mixed, substituted, or enclosed contrary to the listing.
Avoid fuel-based shortcuts such as “masonry is for wood” or “metal is for gas.” A wood stove may use a correctly sized listed liner in a masonry chimney or an approved factory-built chimney. A gas appliance may use an approved lined masonry chimney, B-vent, direct vent, or another system. A pellet appliance may use an approved pellet-vent arrangement routed independently or through an existing chimney. Compatibility comes from the appliance listing, approved vent system, sizing, configuration, and local approval—not from fuel labels alone.
Before converting an existing masonry chimney
Use this sequence:
- Identify every connected appliance. Do not assume an apparently unused opening or flue is isolated.
- Have the flue inspected. Determine whether it is continuous, unobstructed, and free from relevant heat or moisture damage.
- Identify the liner. Establish its material, condition, and approval for the proposed use.
- Measure the flue. Verify actual internal dimensions and the usable route, including offsets.
- Check structure and clearances. Evaluate support, visible movement, and accessible relationships to combustible materials.
- Read the new appliance manual. Start with its required vent type, size, height, connector, and termination.
- Develop an approved vent path. Do not select a liner merely because it physically fits.
- Obtain permits and approval where required.
- Complete the required inspection before operation.
Relining can sometimes adapt a masonry chimney for a different appliance. It is not always feasible and is not automatically preferable to a dedicated listed vent system. Conversely, a sound masonry shell may provide a useful route for a properly selected and approved lining system.
Make the decision in the right order: choose the appliance, identify its approved vent path, verify that the building can accommodate that path, and only then weigh architecture, budget, and maintenance preferences.
Frequently Asked Questions
Does every masonry chimney need a liner?
A masonry chimney serving a combustion appliance or fireplace generally should have a full-length liner suitable for that use. The liner must match the appliance, fuel, operating conditions, listing, manufacturer instructions, and governing requirements.
An old chimney being unlined does not make continued use acceptable. Nor does the presence of clay tile prove that the lining is intact or correctly sized. Cracks, missing sections, open joints, blockages, or unsuitable lining call for professional evaluation before use.
What is the difference between a chimney cap and a chimney crown?
The cap covers the flue opening. It can reduce direct rain entry and help keep out animals and debris while allowing exhaust to escape.
The crown covers the top of the masonry chimney around the flue or flues. It should slope outward, accommodate the joint around each liner, and shed water away from the masonry. A drip edge helps runoff fall clear of the chimney face.
They are complementary, not interchangeable. A cap does not seal a cracked crown, and a crown does not cover an open flue.
How often should a masonry chimney be inspected or cleaned?
Arrange periodic professional inspection and follow any interval required by the appliance manufacturer, insurer, local authority, or applicable standard. Inspection is also appropriate after a suspected chimney fire, known blockage, significant storm damage, recurring leak, building alteration, long period of disuse, or appliance change.
Cleaning should be based on condition. Fuel, frequency of use, burning practices, appliance performance, soot or creosote accumulation, debris, and manufacturer instructions all affect when sweeping is needed. A general calendar recommendation does not prove that every chimney needs cleaning on precisely the same schedule.
Can an old masonry chimney be used for a wood stove, pellet stove, gas appliance, or insert?
Possibly, but age and exterior appearance do not answer the question. The flue must be inspected, measured, and evaluated for liner condition, dimensions, configuration, clearances, obstructions, and compatibility with the proposed appliance.
Different appliances can require different vent materials and arrangements. A new approved liner may make some conversions possible; in other cases, a dedicated listed vent system may be safer, simpler, or the only approved option.
What masonry chimney problems mean I should stop using the fireplace or appliance?
Stop use for:
- A carbon-monoxide alarm
- Smoke entering the room or persistent back-drafting
- A suspected chimney fire
- A known cracked, missing, or seriously damaged liner
- Falling flue-tile fragments
- A blocked flue
- Major cracks or displaced masonry
- A leaning or bulging chimney
- Falling brick, crown material, or other masonry
- Any condition a qualified professional has identified as unsafe
For a carbon-monoxide alarm or suspected active fire, leave the building and follow emergency guidance rather than attempting improvised troubleshooting.
The safest final sequence is straightforward: identify the chimney type and connected appliance, document visible conditions, stop use when combustion or structural warning signs appear, and arrange the appropriate professional evaluation. Check any repair or conversion against the appliance instructions, approved vent system, permits, and current local requirements.
A masonry chimney remains serviceable only when all three systems work together: its structure is adequately supported, its internal flue is suitable for the connected appliance, and its exterior keeps water where it belongs.